|
yarf 0.1
Yet Another RepRap Firmware
|
|
yarf 0.1
Yet Another RepRap Firmware
|
This is the Yarf documentation, generated from the source code by Doxygen. It is divided into the following sections:
Detailed source code documentation can be browsed by clicking the Files link above or by searching using the text box on the upper right.
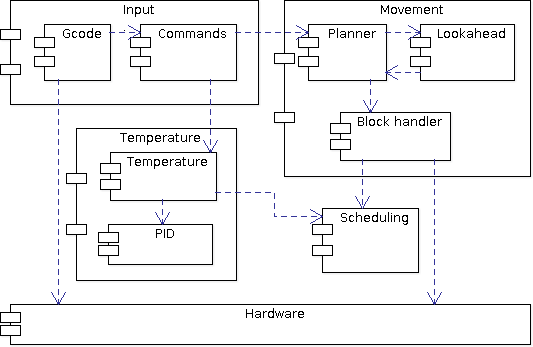
Input from the host is received through the hardware USART. The Gcode component parses, verifies and decodes this input and then calls a method corresponding to the received g-code command in the Command component. This component is a small dispatching layer that calls a method in either the Planner component or the Temperature component, to execute the command.
The Planner component handles movement commands. Each linear movement command is transformed into a block. These blocks are placed into a FIFO planning queue. The Block Handler component consumes blocks from this queue and actually executes them. This component runs asynchronously from the rest of the firmware (as if it runs in a separate thread). It uses the Scheduling component to schedule each stepper motor step that needs to be taken at the right microsecond in time. It controls the stepper motors and it reads the status of the endstop switches through the Hardware component. The Lookahead component, if enabled, tries to maximize the speed between consecutive blocks in the planning queue, while still keeping the jerkyness of the machine below a predetermined amount.
The Temperature component manages the temperature of the nozzle and the print bed. It uses the PID component to control these temperatures and to minimize temperature fluctuation. Currently it reads thermistor values and sets the heater's duty cycle by directly interfacing with the MCU, i.e., without using the Hardware component.
The Yarf firmware is designed to be compatible with multiple electronic boards. Supported boards are defined in the src/boards.h file. If your board is not supported, you can add a new entry in this file. Best is to start by copying an existing board configuration and then customize it as needed. Be careful, as a wrong board configuration can cause physical damage to the machine and/or electronics!
Once you have determined the board to use, you should set its index as the value of the BOARD configuration parameter in src/config.h.
To convert measured thermistor resistance values to actual temperatures, the firmware relies on so called thermistor lookup tables. Each thermistor device has its own resistance to temperature map, so you need to generate a table for the specific thermistor you are using. You can use the tltgen application for this and you can place the resulting lookup table in the src/temperature folder with filename "thermistor_table.h".
Before compiling the firmware, a number of parameters need to be configured for your specific machine. All configuration parameters are listed and documented in the src/config.h file. Each of these must be set to a correct value.
Requirements for compiling are the avr-gcc compiler and the avr-libc standard C library.
To compile the firmware, first make sure the correct device is set up as the value of the GCC_MCU parameter in the "Makefile" file in the firmware's main directory (not the src directory). The list of devices supported by avr-gcc can be found in the avr-gcc user manual. Note that just because a device is supported by avr-gcc, does not mean it is supported by Yarf.
You can compile the firmware by running "make" in the firmware's main directory (not the src directory). You might want to clean the build environment first by running "make clean".
The output of the make command should look like this:
$ make
avr-gcc -std=c99 -Isrc/ -mmcu=atmega1284p -O2 -fpack-struct -fshort-enums -funsigned-bitfields -funsigned-char -Wall -Wstrict-prototypes -c src/yarf.c -o src/yarf.o
avr-gcc -std=c99 -Isrc/ -mmcu=atmega1284p -O2 -fpack-struct -fshort-enums -funsigned-bitfields -funsigned-char -Wall -Wstrict-prototypes -c src/hardware/io.c -o src/hardware/io.o
avr-gcc -std=c99 -Isrc/ -mmcu=atmega1284p -O2 -fpack-struct -fshort-enums -funsigned-bitfields -funsigned-char -Wall -Wstrict-prototypes -c src/hardware/usart.c -o src/hardware/usart.o
avr-gcc -std=c99 -Isrc/ -mmcu=atmega1284p -O2 -fpack-struct -fshort-enums -funsigned-bitfields -funsigned-char -Wall -Wstrict-prototypes -c src/input/gcode.c -o src/input/gcode.o
avr-gcc -std=c99 -Isrc/ -mmcu=atmega1284p -O2 -fpack-struct -fshort-enums -funsigned-bitfields -funsigned-char -Wall -Wstrict-prototypes -c src/temperature/thermistor_table.c -o src/temperature/thermistor_table.o
avr-gcc -std=c99 -Isrc/ -mmcu=atmega1284p -O2 -fpack-struct -fshort-enums -funsigned-bitfields -funsigned-char -Wall -Wstrict-prototypes -c src/temperature/temperature.c -o src/temperature/temperature.o
avr-gcc -std=c99 -Isrc/ -mmcu=atmega1284p -O2 -fpack-struct -fshort-enums -funsigned-bitfields -funsigned-char -Wall -Wstrict-prototypes -c src/input/commands.c -o src/input/commands.o
avr-gcc -std=c99 -Isrc/ -mmcu=atmega1284p -O2 -fpack-struct -fshort-enums -funsigned-bitfields -funsigned-char -Wall -Wstrict-prototypes -c src/hardware/steppers.c -o src/hardware/steppers.o
avr-gcc -std=c99 -Isrc/ -mmcu=atmega1284p -O2 -fpack-struct -fshort-enums -funsigned-bitfields -funsigned-char -Wall -Wstrict-prototypes -c src/movement/planner.c -o src/movement/planner.o
avr-gcc -std=c99 -Isrc/ -mmcu=atmega1284p -O2 -fpack-struct -fshort-enums -funsigned-bitfields -funsigned-char -Wall -Wstrict-prototypes -c src/movement/planner_queue.c -o src/movement/planner_queue.o
avr-gcc -std=c99 -Isrc/ -mmcu=atmega1284p -O2 -fpack-struct -fshort-enums -funsigned-bitfields -funsigned-char -Wall -Wstrict-prototypes -c src/movement/block_handler.c -o src/movement/block_handler.o
avr-gcc -std=c99 -Isrc/ -mmcu=atmega1284p -O2 -fpack-struct -fshort-enums -funsigned-bitfields -funsigned-char -Wall -Wstrict-prototypes -c src/movement/planner_lookahead.c -o src/movement/planner_lookahead.o
avr-gcc -std=c99 -Isrc/ -mmcu=atmega1284p -O2 -fpack-struct -fshort-enums -funsigned-bitfields -funsigned-char -Wall -Wstrict-prototypes -c src/temperature/pid.c -o src/temperature/pid.o
avr-gcc -std=c99 -Isrc/ -mmcu=atmega1284p -O2 -fpack-struct -fshort-enums -funsigned-bitfields -funsigned-char -Wall -Wstrict-prototypes -c src/scheduling/periodic.c -o src/scheduling/periodic.o
avr-gcc -std=c99 -Isrc/ -mmcu=atmega1284p -O2 -fpack-struct -fshort-enums -funsigned-bitfields -funsigned-char -Wall -Wstrict-prototypes -c src/scheduling/realtime_timer.c -o src/scheduling/realtime_timer.o
avr-gcc -std=c99 -Isrc/ -mmcu=atmega1284p -O2 -fpack-struct -fshort-enums -funsigned-bitfields -funsigned-char -Wall -Wstrict-prototypes -c src/hardware/clock.c -o src/hardware/clock.o
avr-gcc -std=c99 -Isrc/ -mmcu=atmega1284p -O2 -fpack-struct -fshort-enums -funsigned-bitfields -funsigned-char -Wall -Wstrict-prototypes -c src/util/delays.c -o src/util/delays.o
avr-gcc -o yarf.elf src/yarf.o src/hardware/io.o src/hardware/usart.o src/input/gcode.o src/temperature/thermistor_table.o src/temperature/temperature.o src/input/commands.o src/hardware/steppers.o src/movement/planner.o src/movement/planner_queue.o src/movement/block_handler.o src/movement/planner_lookahead.o src/temperature/pid.o src/scheduling/periodic.o src/scheduling/realtime_timer.o src/hardware/clock.o src/util/delays.o -Wl,-Map,yarf.elf.map,-u,vfprintf,-u,vfscanf -mmcu=atmega1284p -lm -lprintf_flt -lscanf_flt
The resulting binary is named "yarf.elf".
You can get info about the size of the compiled firmware by running "make stats":
$ make stats
avr-size -C --mcu=atmega1284p yarf.elf
AVR Memory Usage
----------------
Device: atmega1284p

Program:   35654 bytes (27.2% Full)
(.text + .data + .bootloader)

Data:       3817 bytes (23.3% Full)
(.data + .bss + .noinit)
The first time you upload the firmware, you should program your MCU's fuses correctly. The correct fuse values depend on your specific board. For some boards, suggested fuse values can be found in the src/boards.h file, but these values are currently not programmed into the MCU automatically. Please refer to your MCU's datasheet and your programming software's manual for info about how to program the fuses. Be careful, because incorrectly setting your MCU's fuses can destroy it!
Before uploading the compiled firmware to your device, make sure the AVRDUDE_MCU, AVRDUDE_PROGRAMMER and AVRDUDE_PORT parameters in the Makefile are set correctly. Supported values can be found in the avrdude user manual.
You can then upload the firmware by running "make upload".
The first time you install the firmware, make sure to do a couple of checks before trying to print with it. For instance, check that the endstops and the temperature management are working correctly before going any further.
Yarf is free software: you can redistribute it and/or modify it under the terms of the GNU General Public License as published by the Free Software Foundation, either version 3 of the License, or (at your option) any later version.
Yarf is distributed in the hope that it will be useful, but WITHOUT ANY WARRANTY; without even the implied warranty of MERCHANTABILITY or FITNESS FOR A PARTICULAR PURPOSE. See the GNU General Public License for more details.
You should have received a copy of the GNU General Public License along with Yarf. If not, see <http://www.gnu.org/licenses/>.
Copyright 2012 Pieter Agten
 1.7.4
1.7.4

